Before You Start
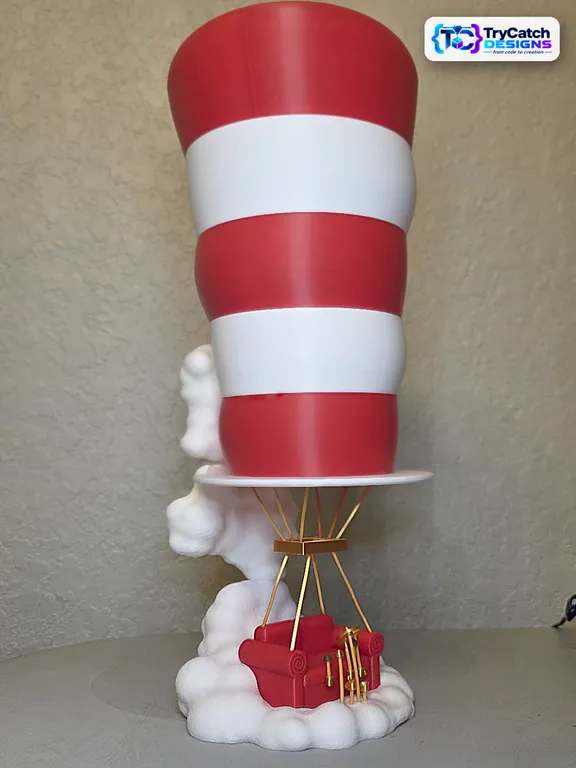
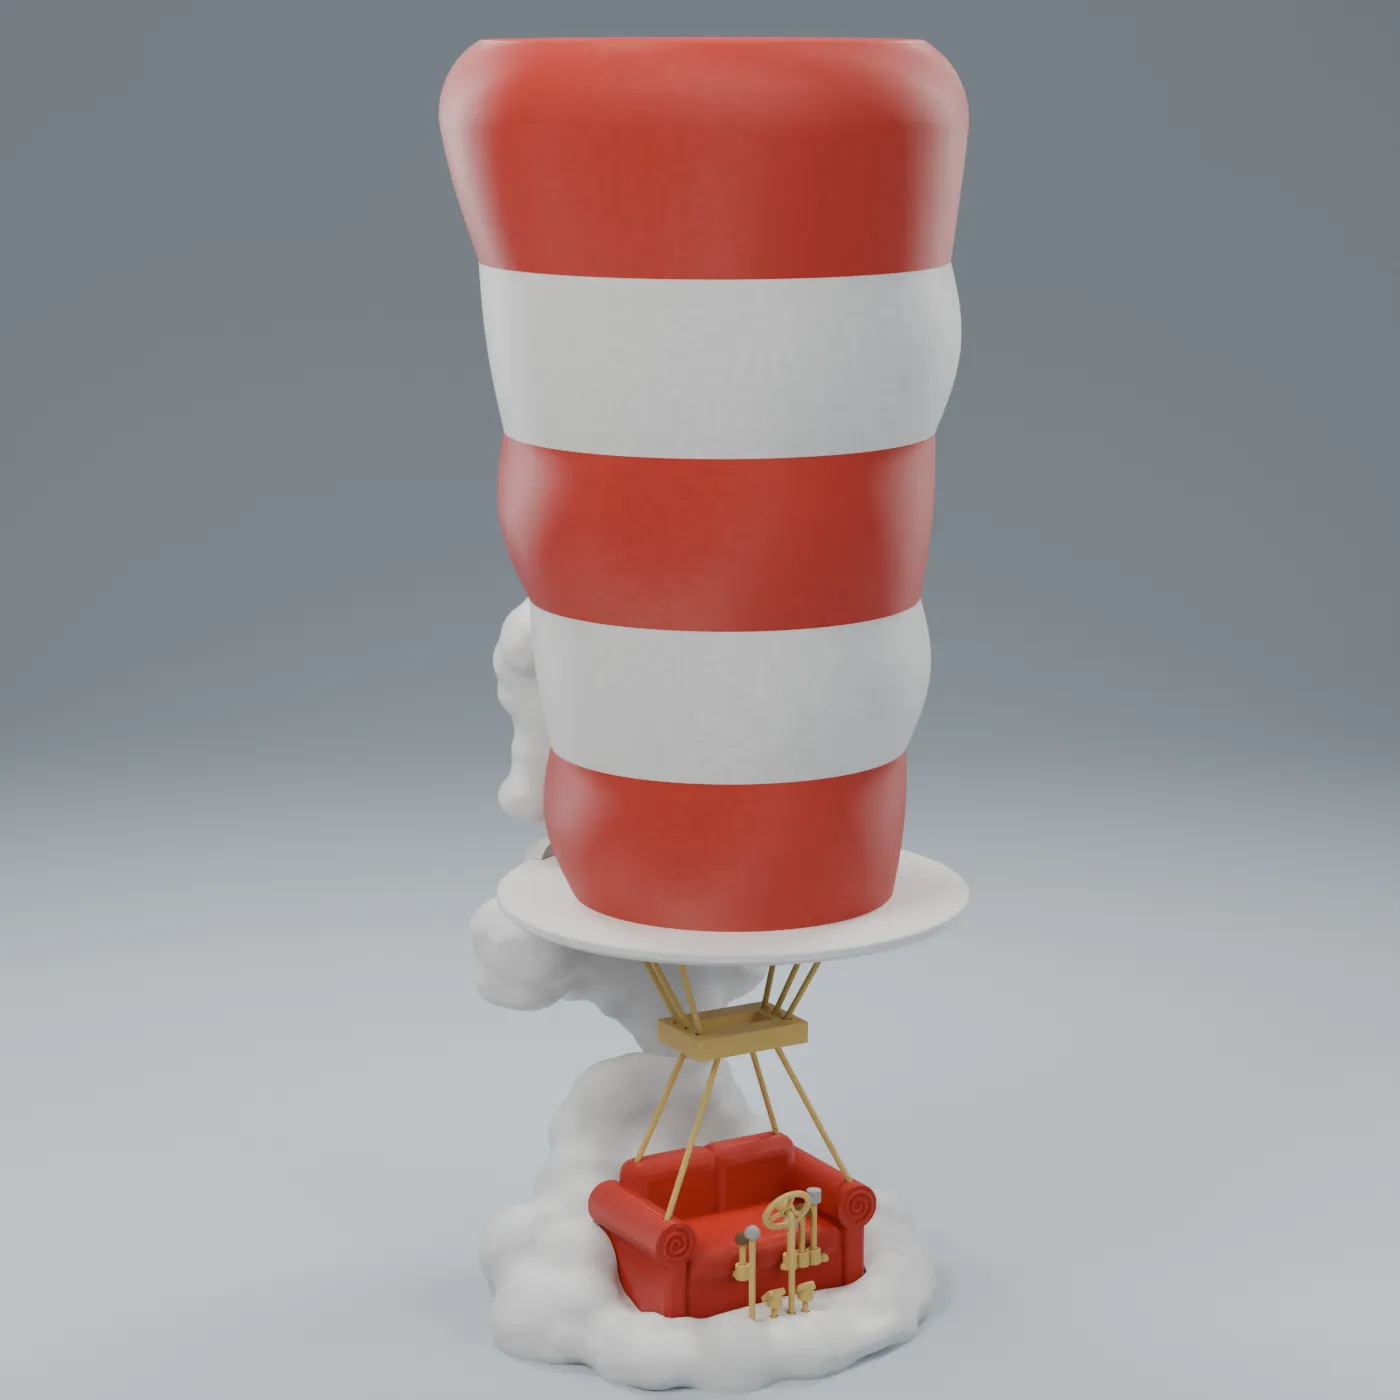
A striped-hat hot air balloon with the red flying couch hanging below it, held up by three clouds behind it. Every part prints separately and is glued together. The clouds carry all the weight. The strings are only for looks.
Left / right in these instructions = as seen from the FRONT of the couch.
Before you glue: Dry fit every joint first. Super glue grabs fast, so make sure each part goes in the right way before any glue goes on.
What you need
- The printed parts (see Printing below)
- Gold PLA filament, 1.75 mm (the same gold used for the levers and bracket), for the strings and control shafts. Optional: 1/16 in brass rod instead of filament for the control shafts (Hobby Lobby carries it). Brass is NOT required. Gold filament looks great and is what the parts are designed around.
- Super glue (CA glue)
- Flush cutters or a hobby knife, a ruler with mm markings
- Hair dryer or heat gun on low (to bend the steering column)
Printing
Plates in the 3MF (Bambu PLA Basic, 0.4 nozzle unless noted):
| Plate | Part | Color |
|---|---|---|
| 1 | 06 Ring 5 (bottom stripe) | Red |
| 2 | 07 Ring 4 | White |
| 3 | 08 Ring 3 | Red |
| 4 | 09 Ring 2 | White |
| 5 | 10 Top Cap (prints upside down) | Red |
| 6 | 05 Brim (prints upside down) | White |
| 7 | 02 Couch | Red |
| 8 | 11 Bracket | Gold |
| 9 | 01 Base Cloud | White |
| 10 | 03 Mid Cloud + 04 Top Cloud | White |
| 11 | Wheel, levers, pedals, knobs | Gold + Silver |
| 12 | 2 dark knobs | Dark brown |
Important: Plates 11 and 12 are labeled “Print with .2 Nozzle”. These parts are tiny. Switch to a 0.2 mm nozzle in Bambu Studio (and on the printer) before slicing those two plates, or they will not print cleanly.
All settings (seams, layer heights, supports, brims) are already saved per part in the 3MF. Just slice and print.
Step 1 – Build the Hat
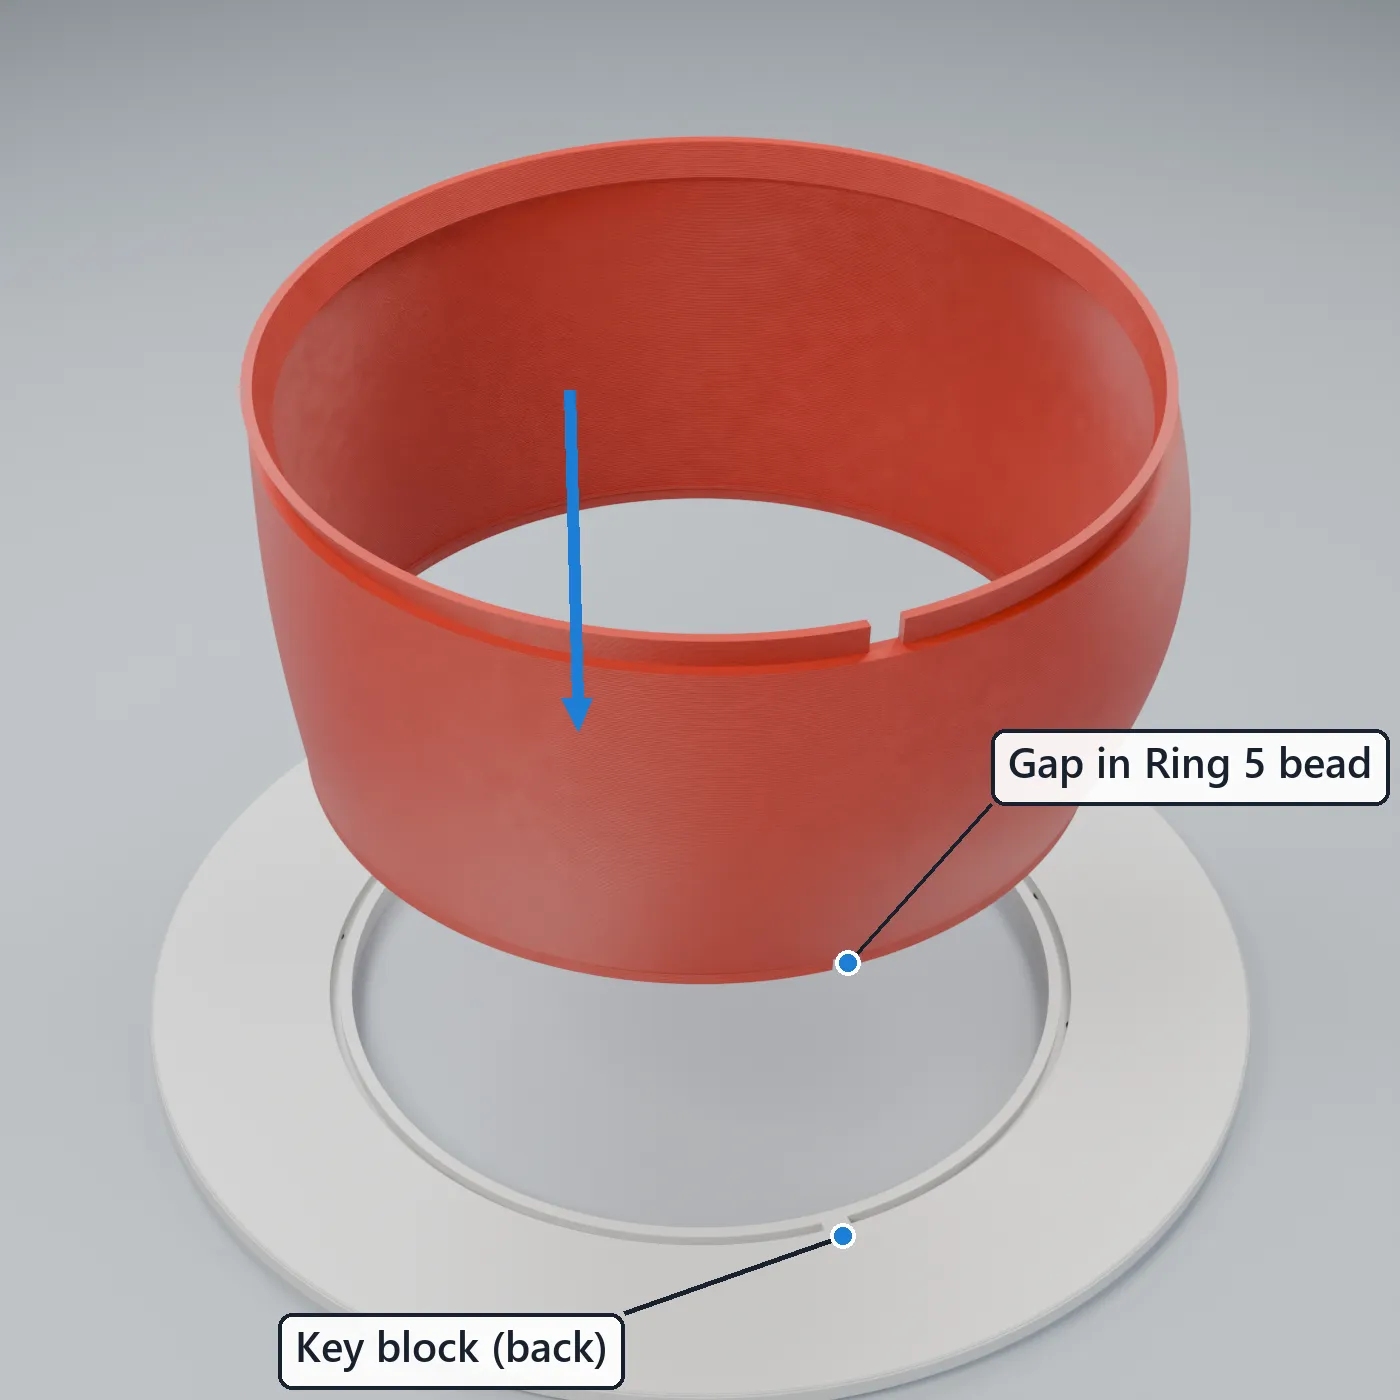
- Brim + Ring 5: The brim has a groove on top with a solid key block at the back. Ring 5 has a bead on its bottom with a gap in it. Line the gap up with the key block and press Ring 5 into the groove. It is a press fit; glue is optional.
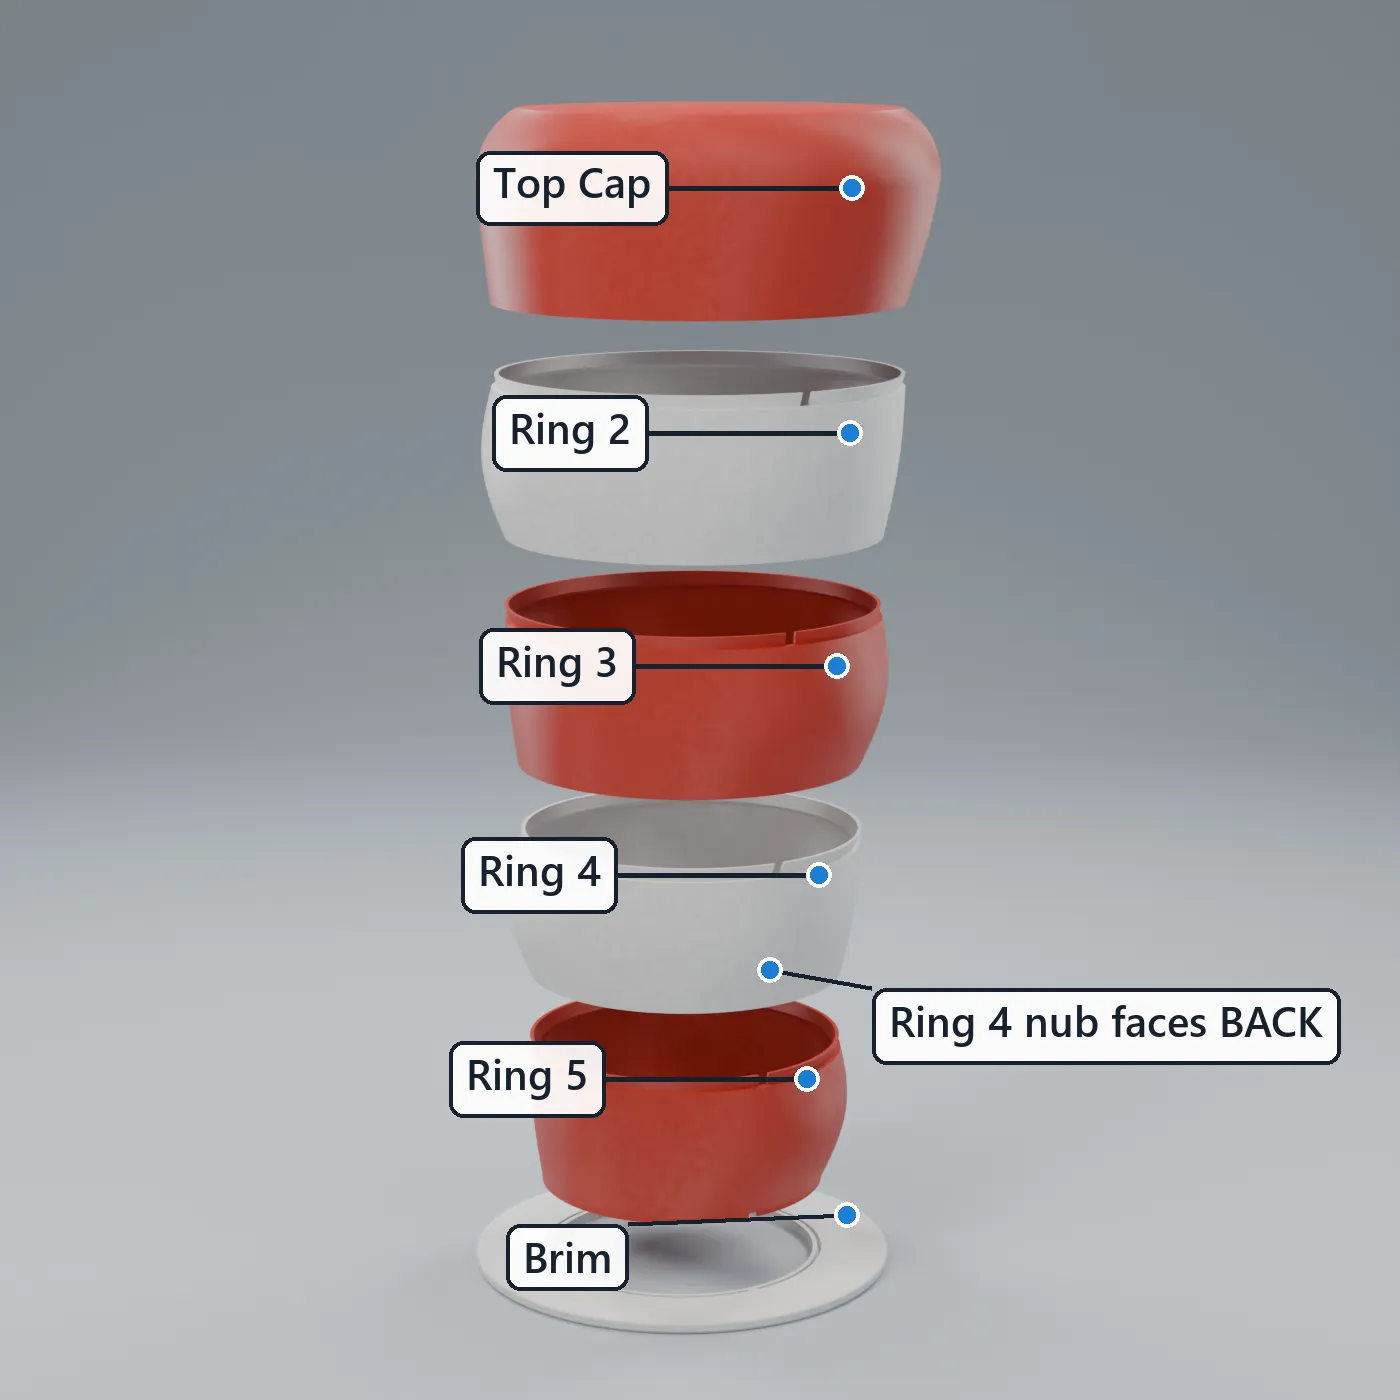
- Stack the rings in order: Ring 5 → Ring 4 → Ring 3 → Ring 2 → Top Cap. Each lower ring has a lip that slides up inside the ring above it. A key rib at the back fits a notch, so each ring only goes on one way. Ring 4 has a small nub on the outside. It must face the BACK (it lines up with the top cloud later).
- Glue each ring joint once the stack fits. Keep the key ribs lined up so the stripes stay straight.
Step 2 – Couch onto the Base Cloud
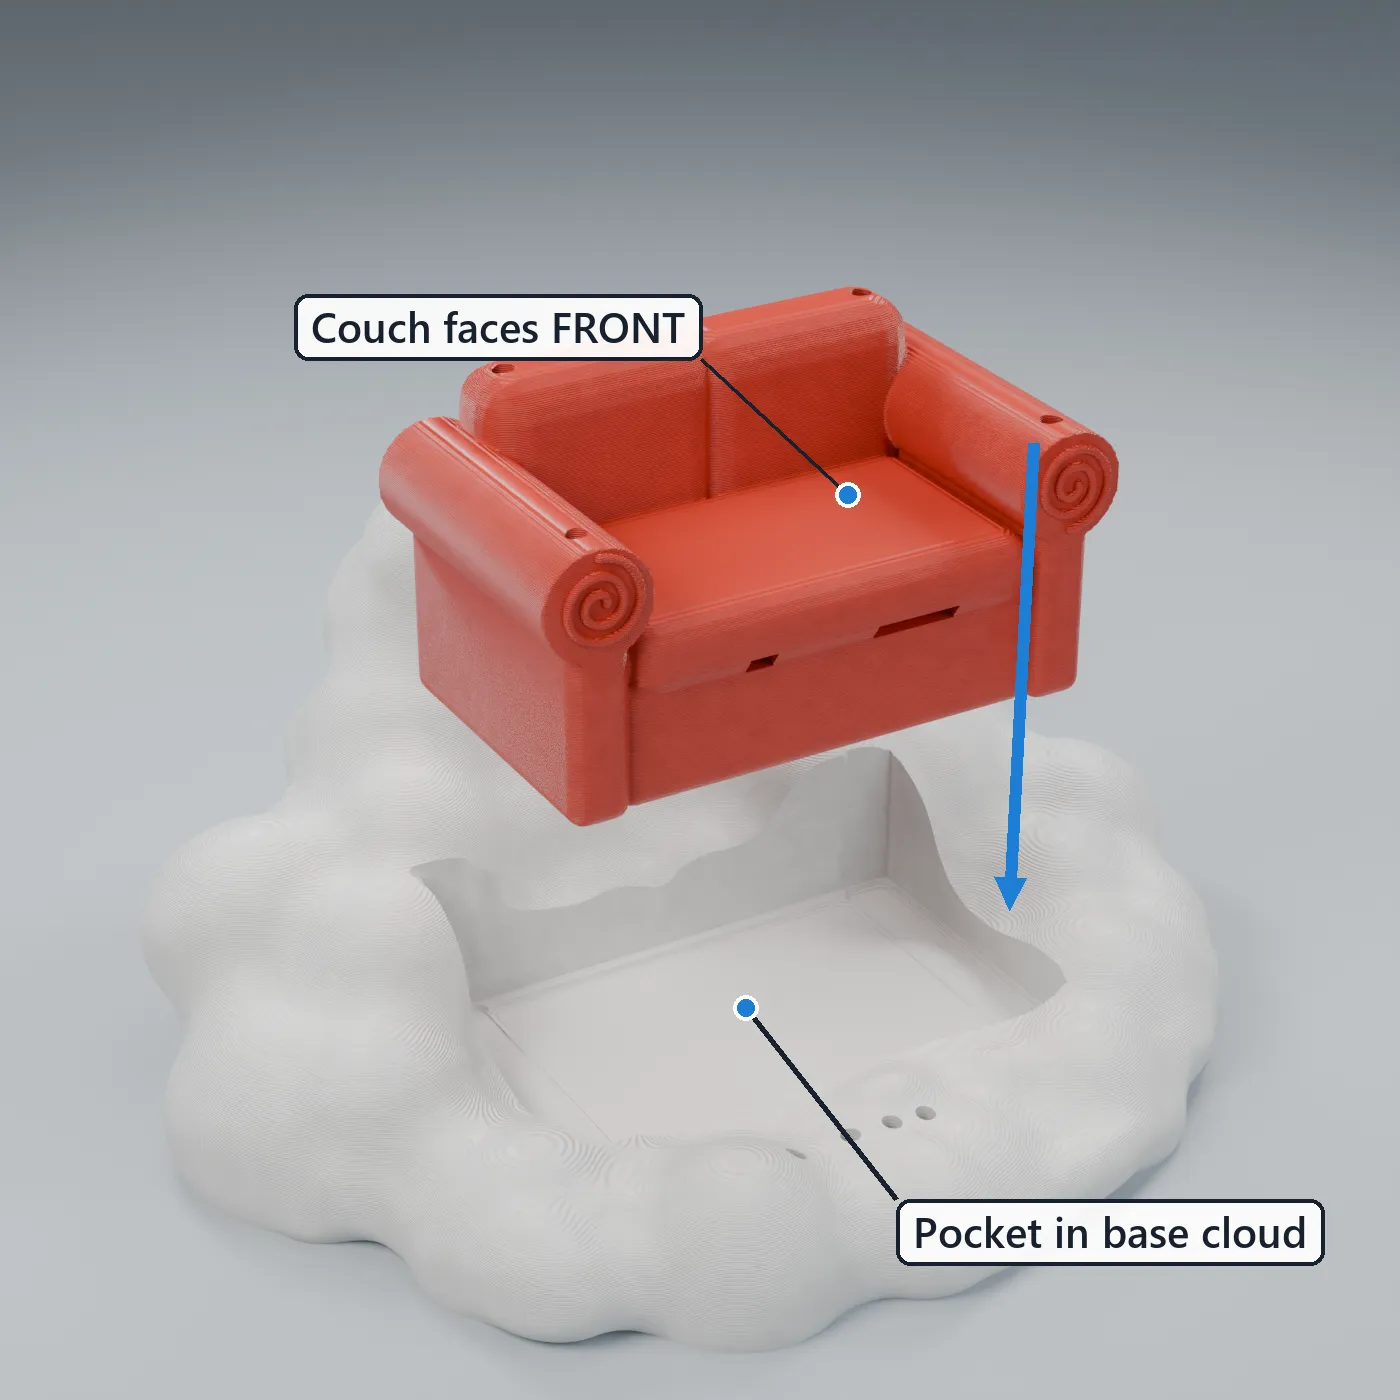
- Set the couch into the pocket in the base cloud (couch facing the front, away from the tall part of the cloud).
- Glue it in place.
Step 3 – Levers on the Front of the Couch
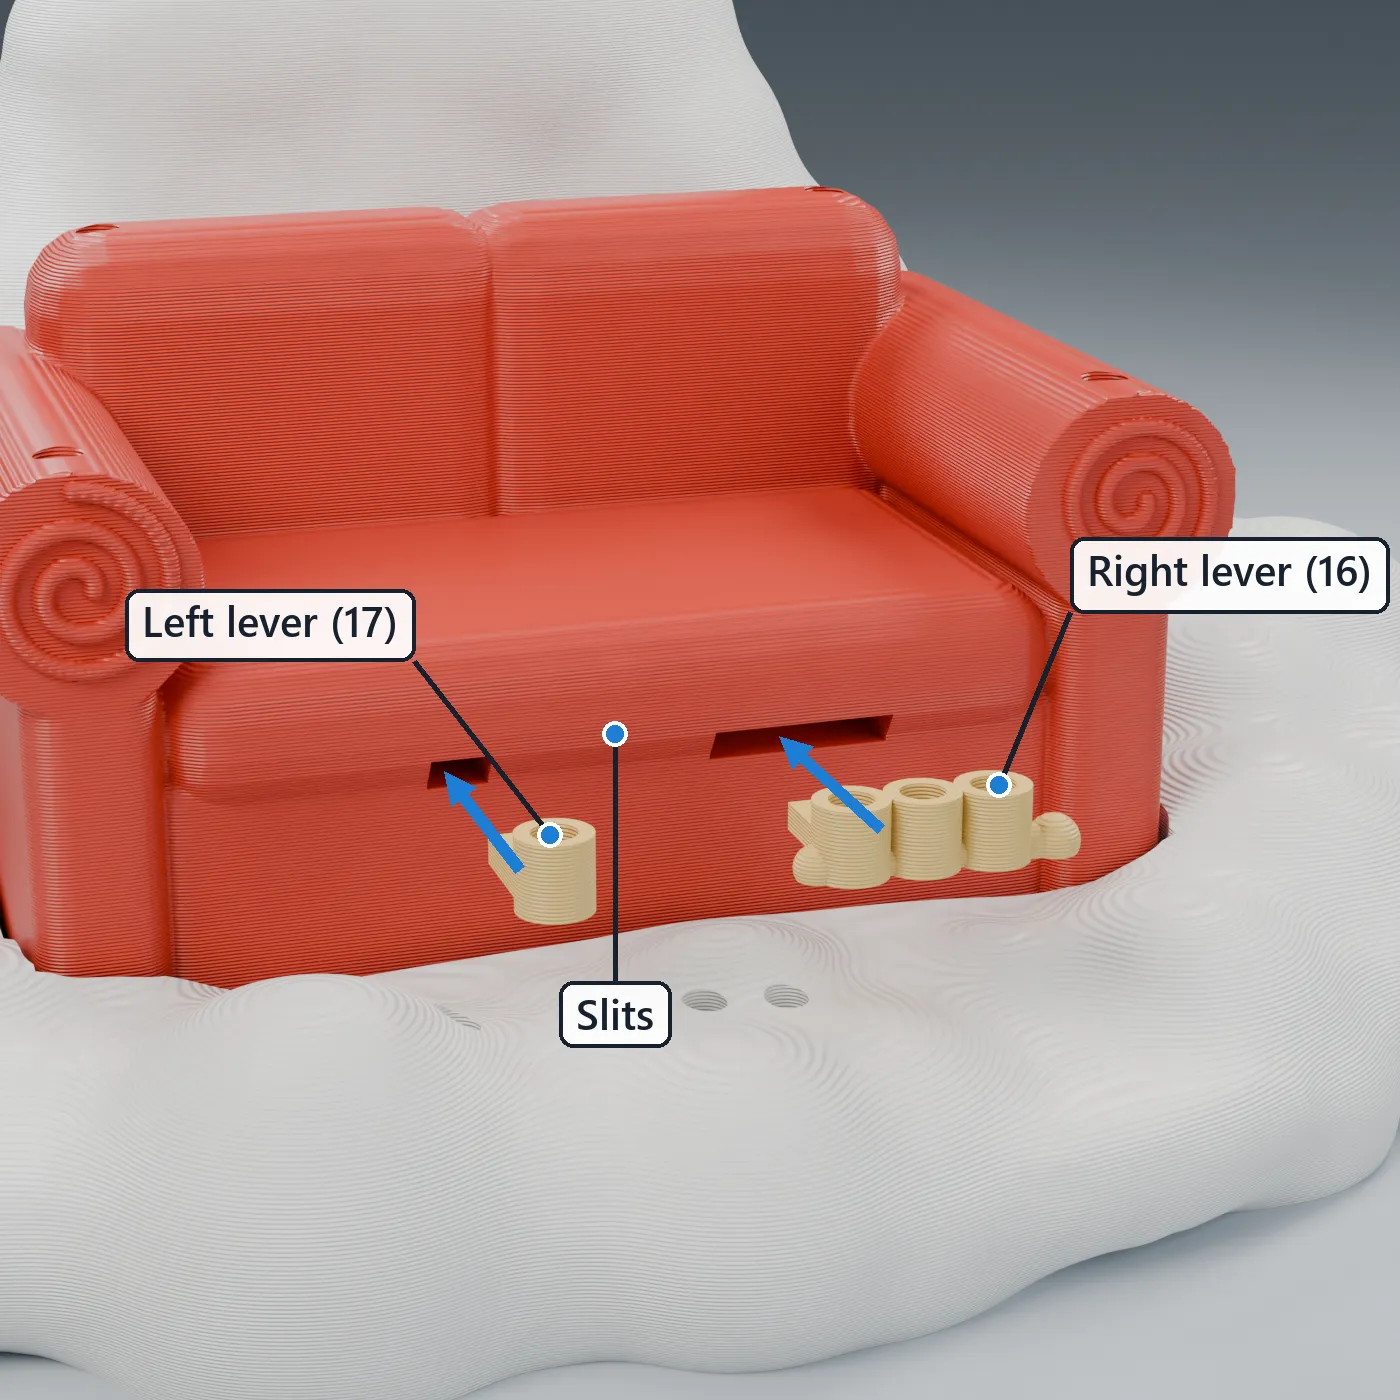
- The couch has a thin slit in the crease between the seat cushion and the base, on each side of the front.
- Slide the flat tongue of the RIGHT lever (16, three sockets) into the right slit, and the LEFT lever (17, one socket) into the left slit. Glue.
Step 4 – Control Shafts
Wheel, shifter, pedals and lever knobs. Cut these from 1.75 mm gold filament (or 1/16 in brass rod). Cut length includes the part that goes into each hole. Cut about 0.5 mm long and trim on the dry fit if unsure. All holes are 2.4 mm, so a little glue fills the gap.
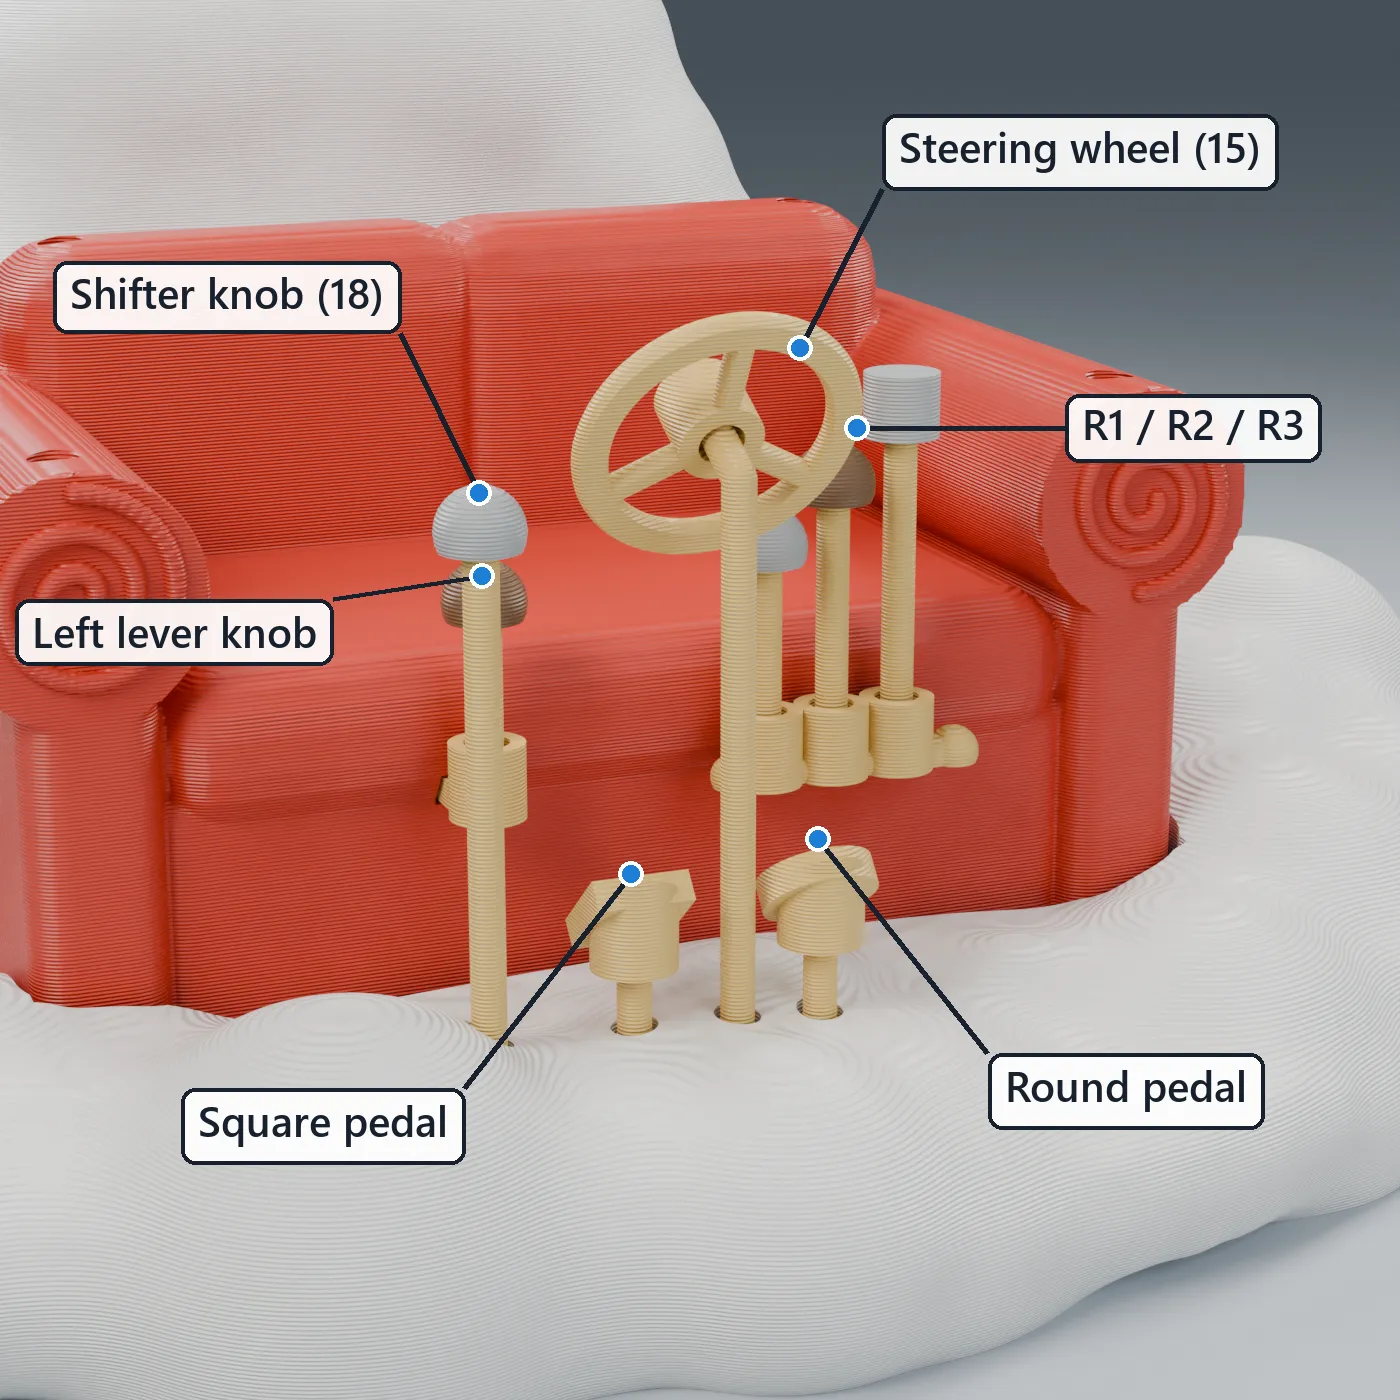
| Shaft | From → To | Visible | Cut |
|---|---|---|---|
| Steering column | base cloud center hole → steering wheel (15), bent 60° | 29.7 | 37.3 mm |
| Shifter | base cloud hole far left → silver ball knob | 23.7 | 30.7 mm |
| Pedal, square | base cloud hole left of column → square pedal | 3.0 | 11.6 mm |
| Pedal, round | base cloud hole right of column → round pedal | 3.7 | 12.2 mm |
| Lever R1 | right lever, left (inner) socket → silver ball | 7.9 | 12.1 mm |
| Lever R2 | right lever, middle socket → dark ball | 10.9 | 15.1 mm |
| Lever R3 | right lever, right (outer) socket → silver cap | 14.0 | 18.2 mm |
| Lever L | left lever socket → dark ball | 6.4 | 10.6 mm |
How deep each end goes in
- Base cloud holes: 6.0 mm
- Lever sockets: 3.2 mm
- Knobs and cap: 1.0 mm
- Steering wheel hub: 1.6 mm
- Pedals: 2.6 mm
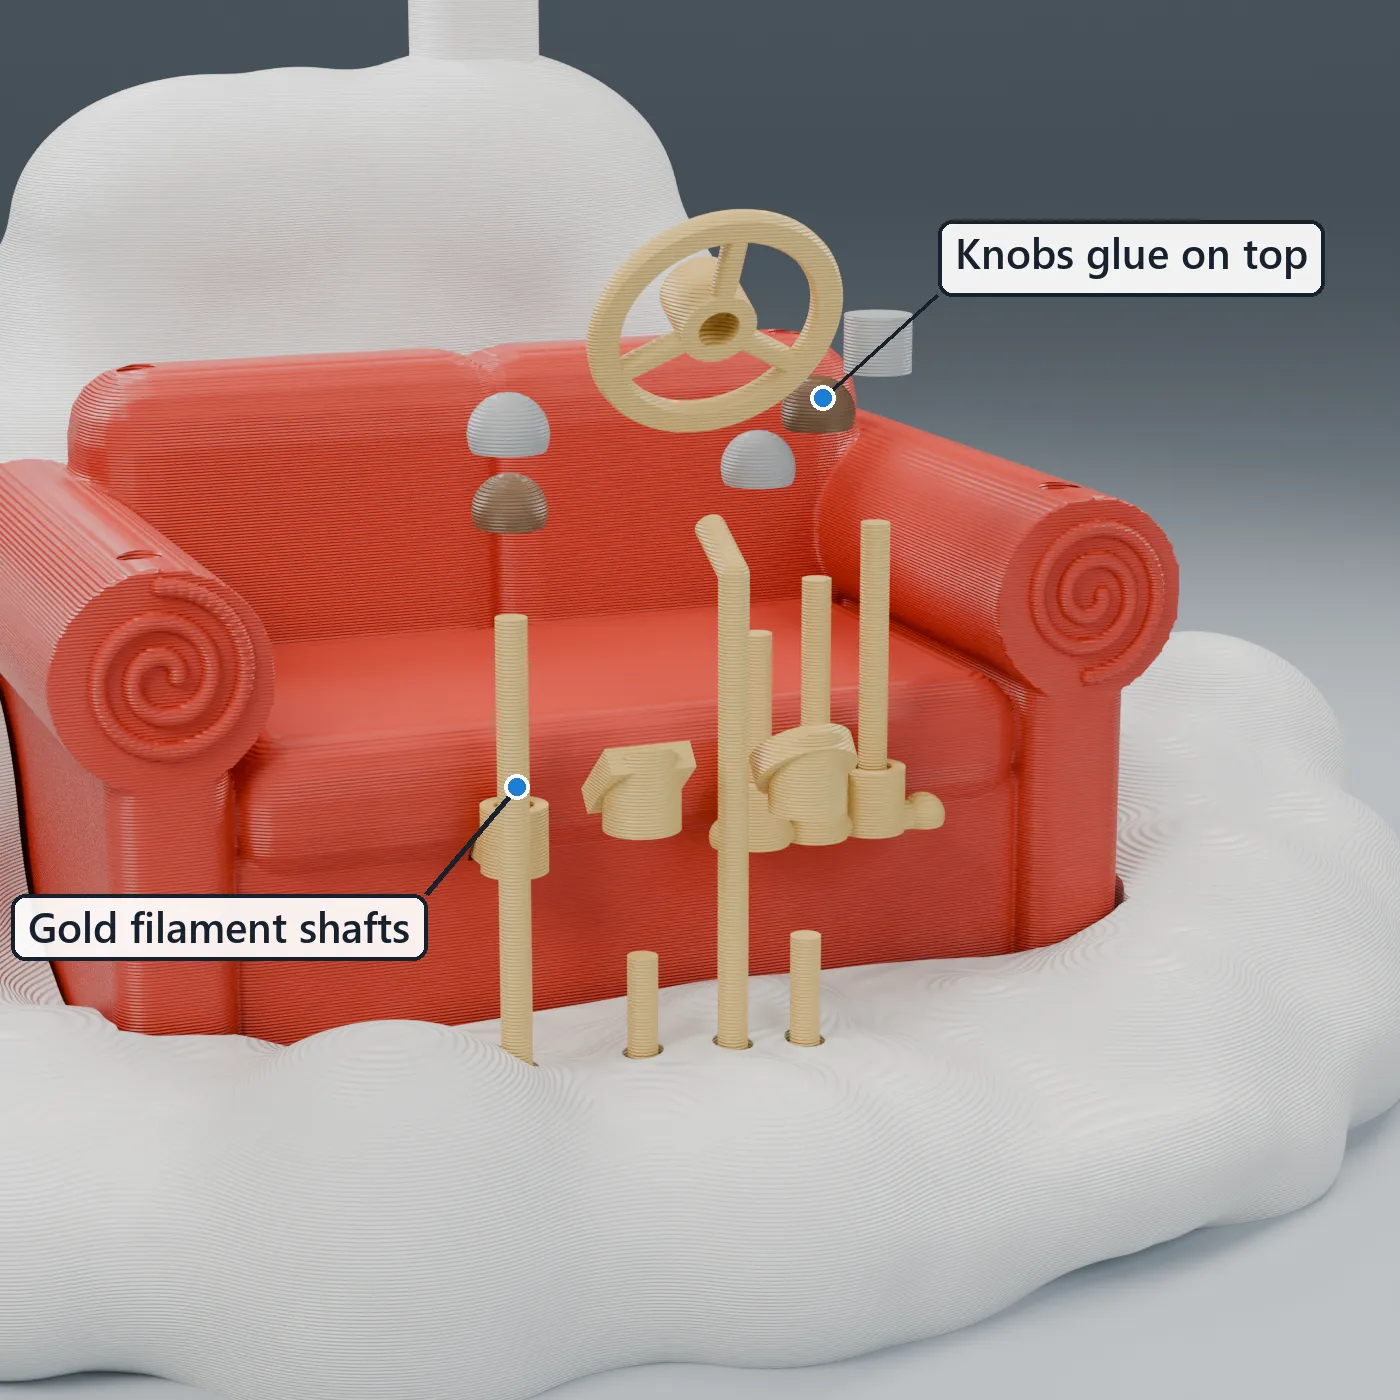
Steering column bend
- Mark the column 33.3 mm from the bottom end (6.0 mm goes into the cloud, 27.3 mm stands above it).
- Bend it 60° at the mark, toward the couch (toward the driver).
- About 4 mm is left past the bend: that end goes into the wheel hub.
Tip: Filament (especially silk) snaps if bent cold. Warm the bend with a hair dryer or heat gun on low first. Brass bends cold.
Knob colors
- Shifter: silver ball (18)
- Right lever: R1 silver ball (19), R2 dark ball (21), R3 silver cap (20)
- Left lever: dark ball (22)
- Pedals: square pad (23) left, round pad (24) right. Each pad has a socket underneath that slips onto its short shaft; the slanted top faces up toward the driver’s feet.
Glue each shaft into its hole, then glue the knob, pad, or wheel on top.
Step 5 – Stack the Clouds
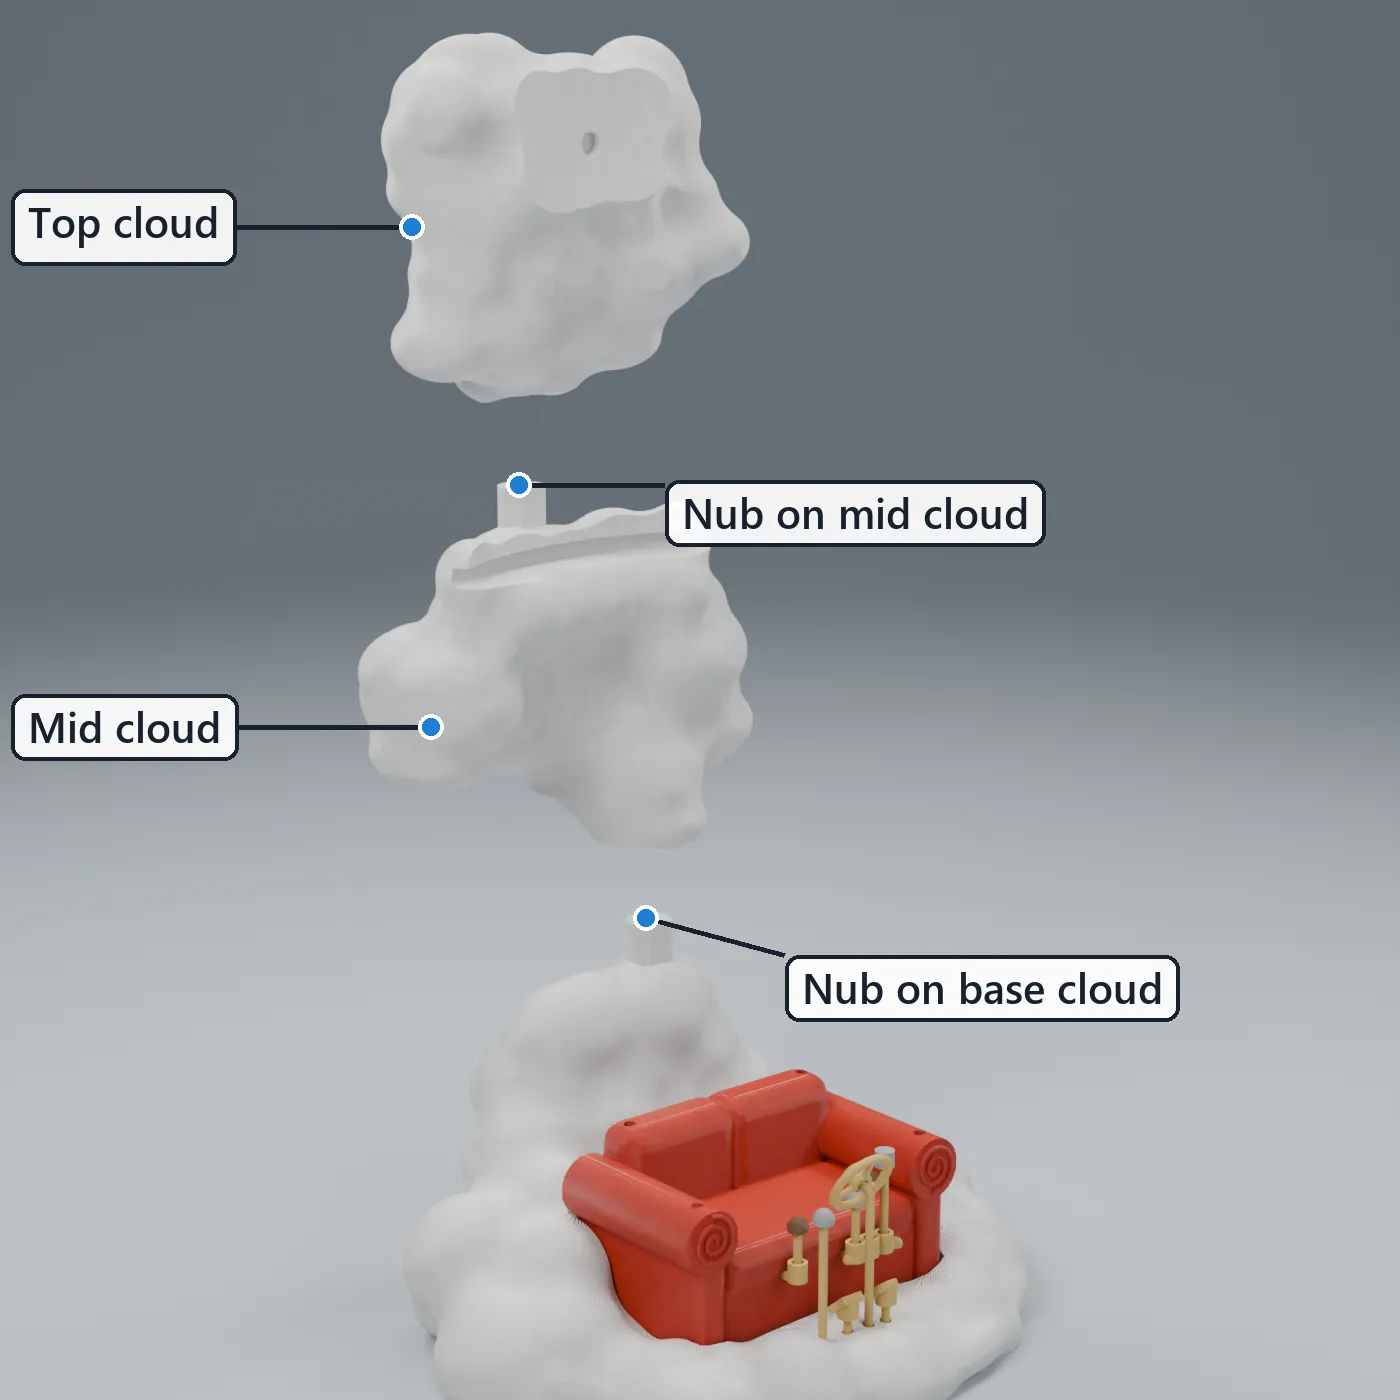
- Mid cloud drops straight down onto the round nub on top of the base cloud’s tall back mound. The flat side of the nub only lets it go on one way.
- Top cloud drops straight down onto the nub on top of the mid cloud.
- Glue both joints.
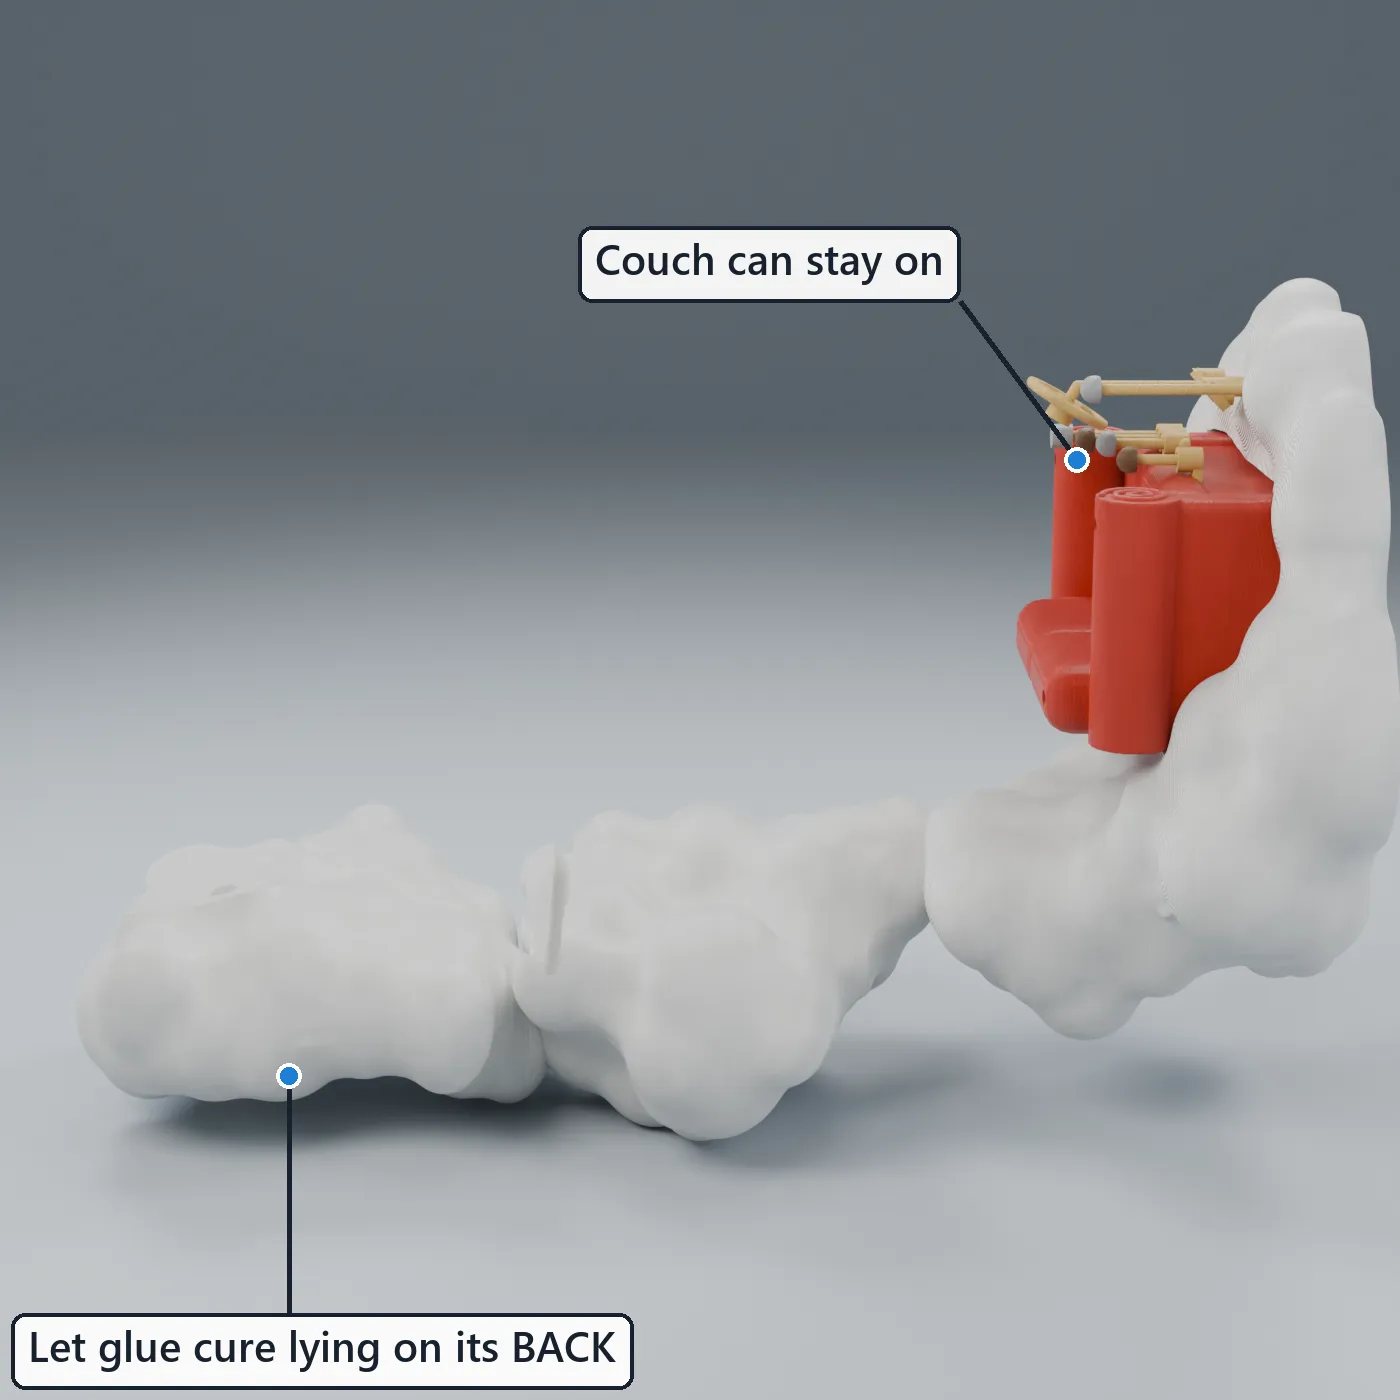
Important – lay it on its back while the glue sets. Glue the clouds together with the whole piece lying on its BACK (clouds toward the table) and let the glue cure that way. The couch can already be on.
If you glue the clouds standing up, the stack slowly leans forward once you sit it up. Cured lying down, it stays set slightly toward the back, so when the hat goes on its weight doesn’t push the clouds forward or tip it. The whole thing stays straight.
Step 6 – Attach the Hat
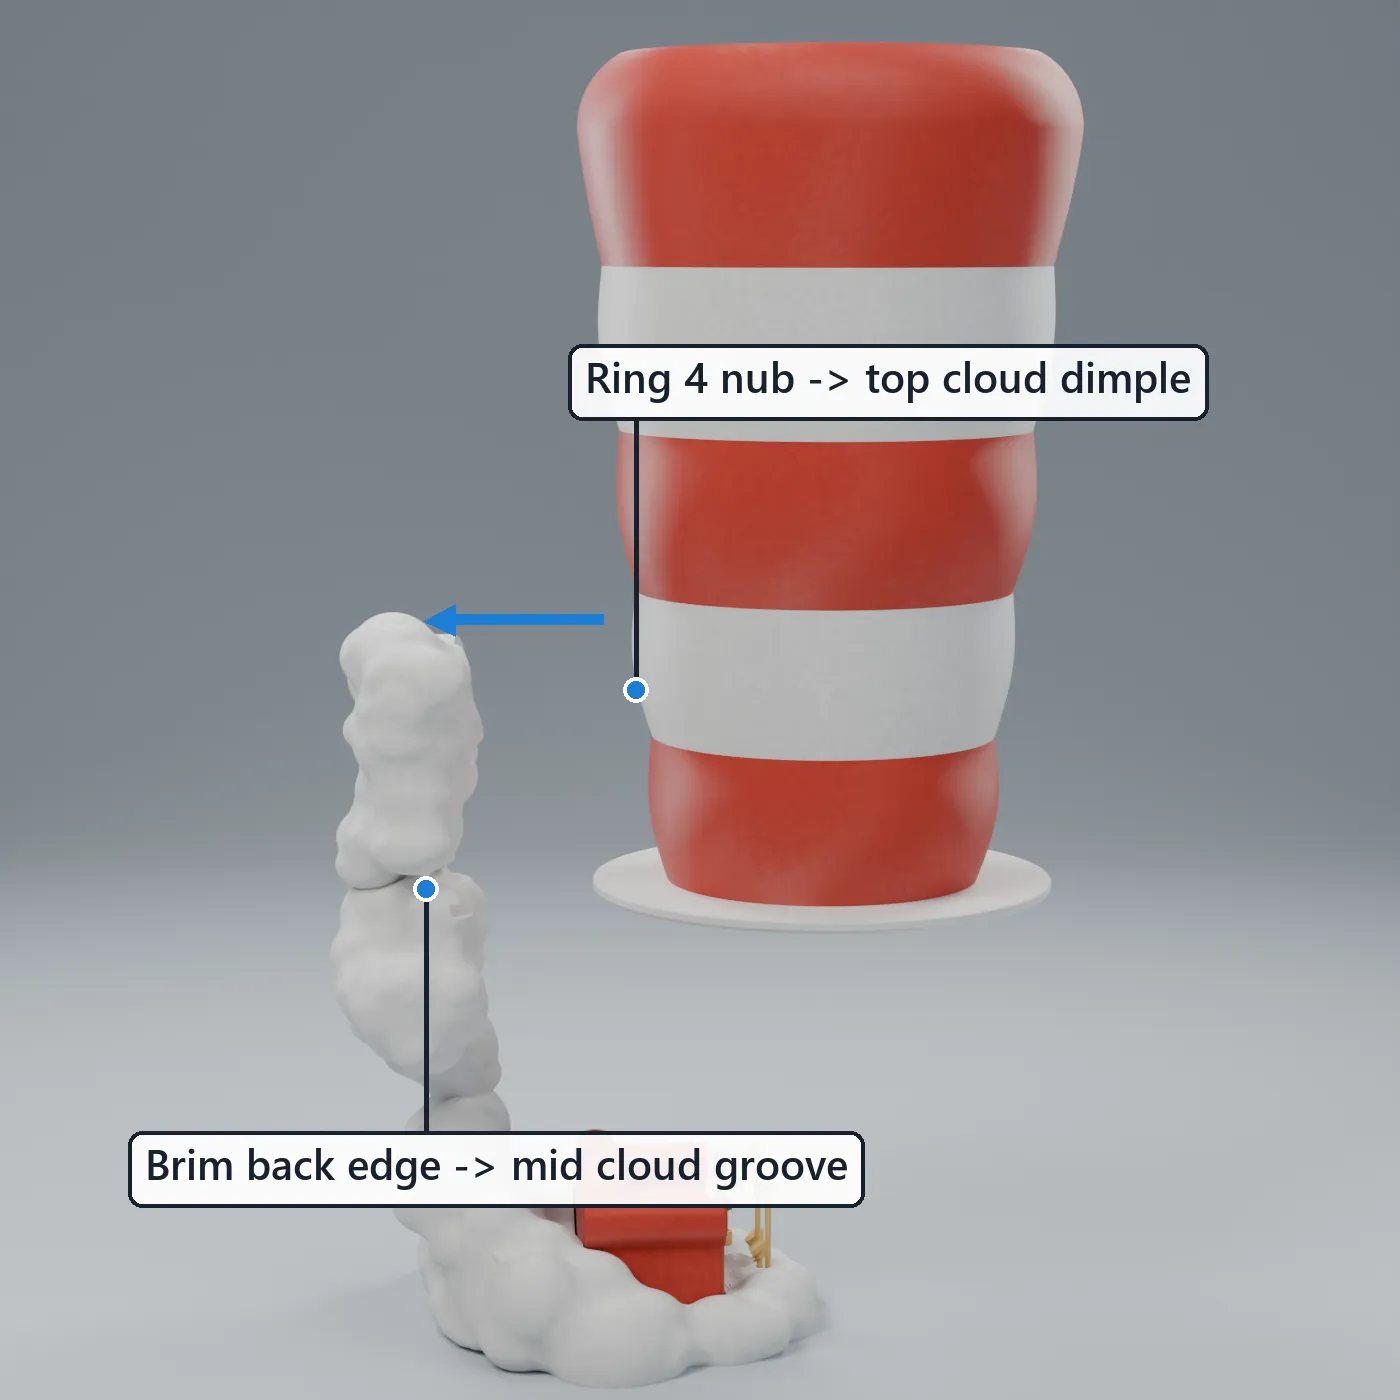
- Hold the finished hat level and slide it straight BACK toward the clouds.
- The back edge of the brim slides into the curved groove in the mid cloud, and the nub on Ring 4 drops into the small dimple on the top cloud pad.
- Dry fit first, then glue at the brim groove and at the top cloud pad.
- Again, lay it on its BACK (clouds toward the table) while the glue sets.
Step 7 – Strings (Couch → Bracket → Balloon)
The strings are 1.75 mm gold filament, cut by hand and glued into 2.4 mm holes. They are decoration only and do not hold any weight.
Hole depths: couch and bracket 4.5 mm (insert 4.0), brim underside 1.6 mm (insert 1.1).
Lower strings: couch → bracket (cut 4)
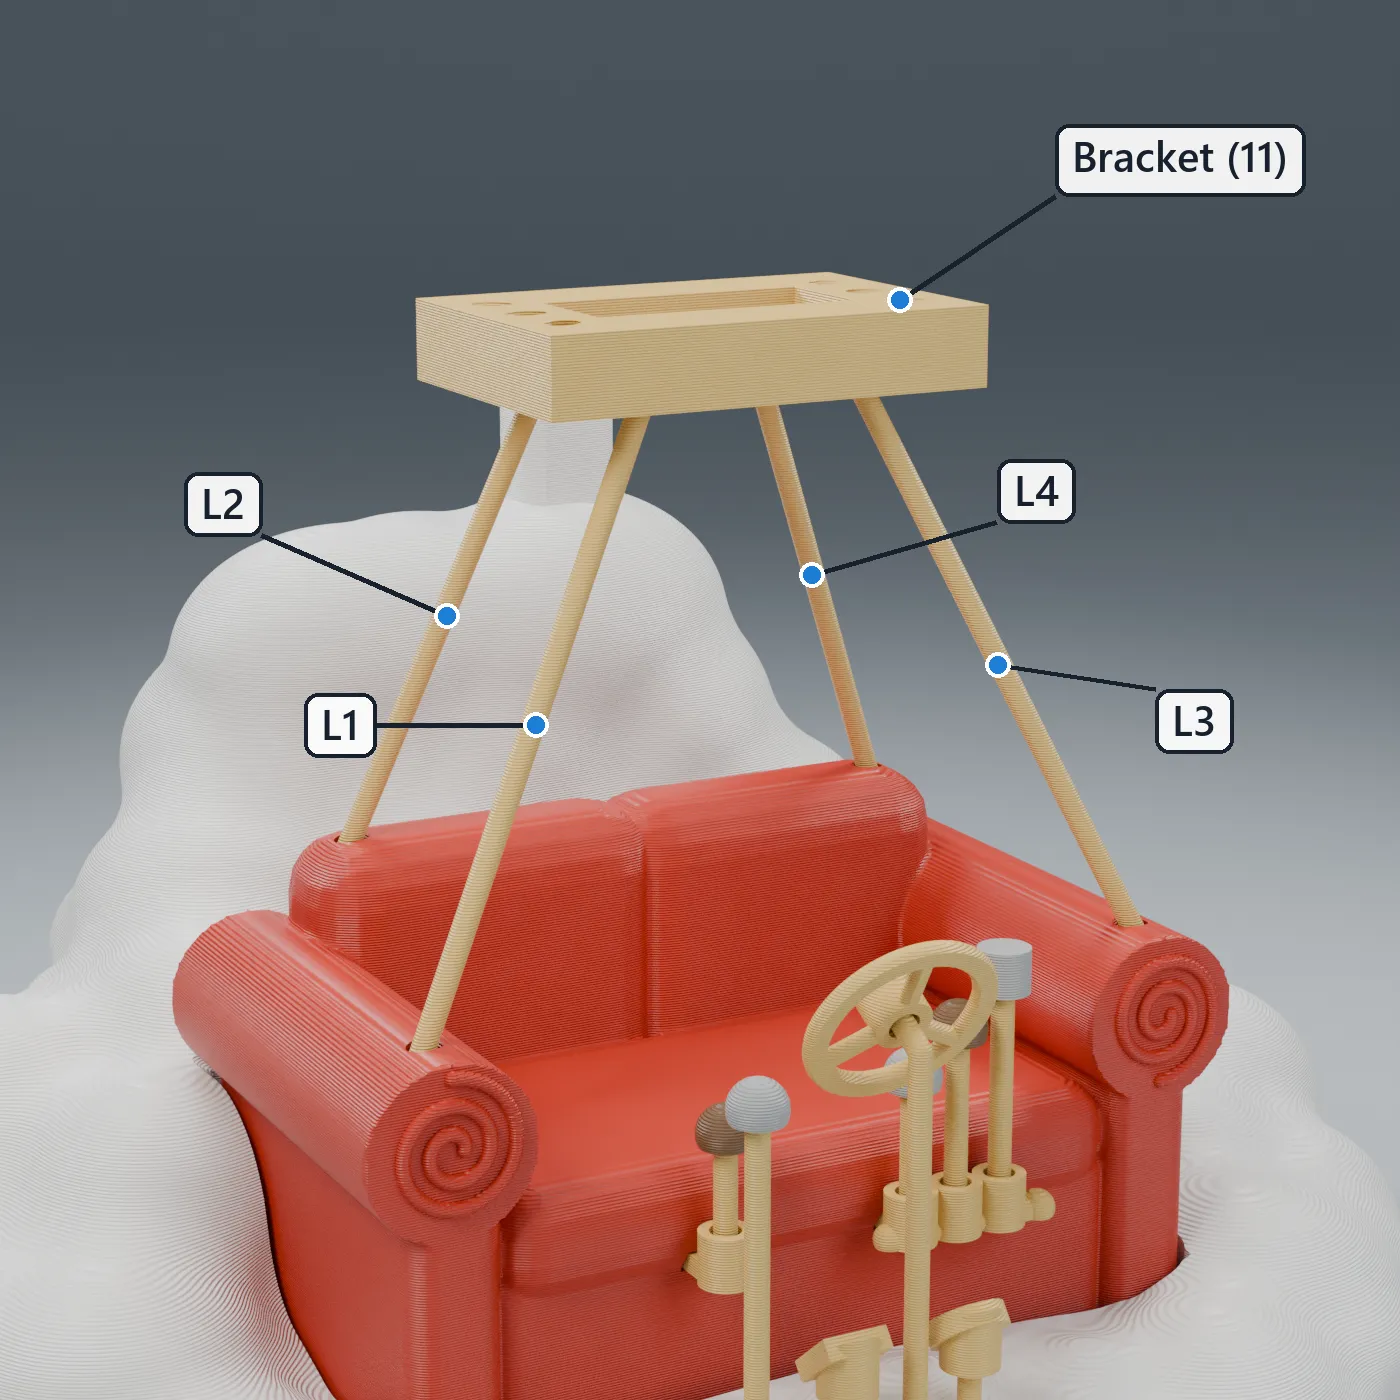
| String | From → To | Visible | Cut |
|---|---|---|---|
| L1 | left arm roll top → bracket front bar (left) | 46.7 | 54.7 mm |
| L2 | left backrest top → bracket back bar (left) | 38.0 | 46.0 mm |
| L3 | right arm roll top → bracket front bar (right) | 46.7 | 54.7 mm |
| L4 | right backrest top → bracket back bar (right) | 38.0 | 46.0 mm |
→ Cut 2 at 54.7 mm (front) and 2 at 46.0 mm (back).
Glue the 4 lower strings into the couch, then hang the bracket on them and glue (bracket level, centered over the couch).
Upper strings: bracket → balloon (cut 6)
| String | From → To | Visible | Cut |
|---|---|---|---|
| U1 | bracket left bar, front → brim left-front | 45.0 | 50.1 mm |
| U2 | bracket left bar, middle → brim left | 45.7 | 50.8 mm |
| U3 | bracket left bar, back → brim left-back | 45.0 | 50.1 mm |
| U4 | bracket right bar, front → brim right-front | 45.1 | 50.2 mm |
| U5 | bracket right bar, middle → brim right | 45.8 | 50.9 mm |
| U6 | bracket right bar, back → brim right-back | 45.1 | 50.2 mm |
→ Easiest: cut all 6 at 50.9 mm, then trim U1, U3, U4, U6 about 0.8 mm on the dry fit.
With the hat already on the clouds, glue the 6 upper strings into the bracket. For the top ends you have two choices:
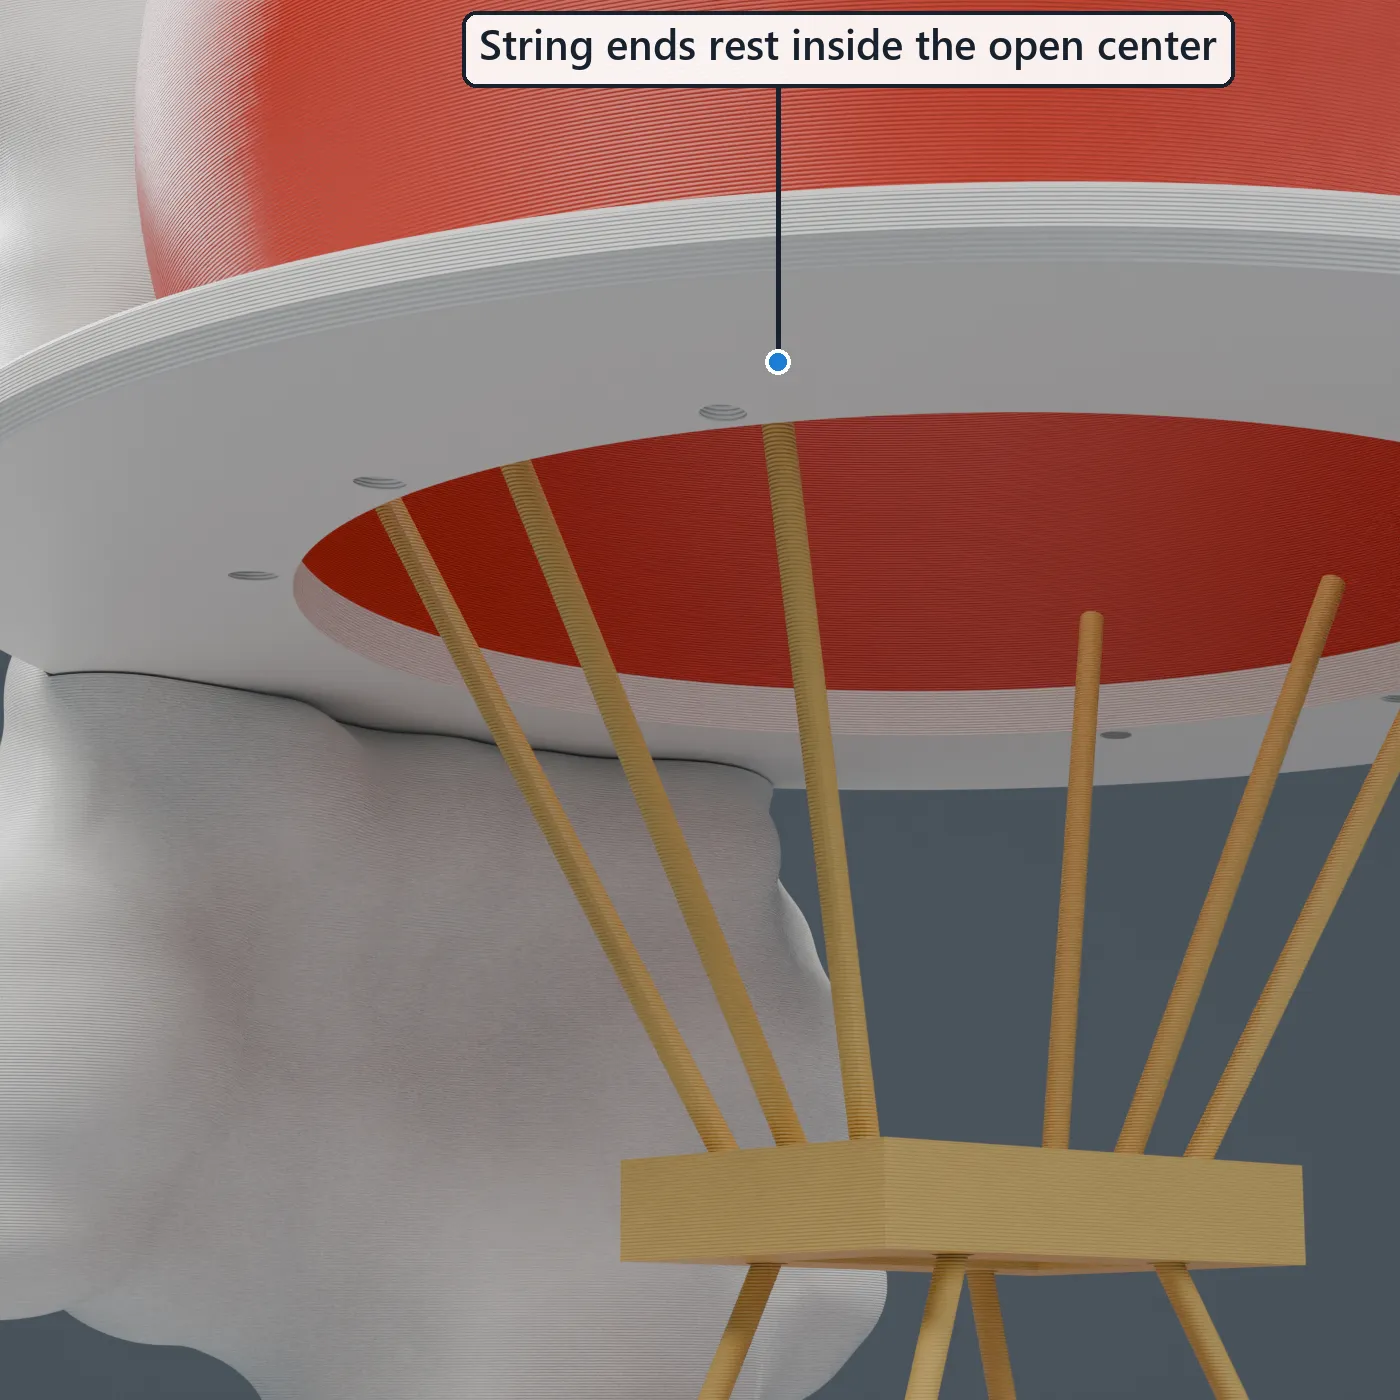

Option A – Easy (recommended): No glue at the top. Because the strings are glued firmly into the bracket, they hold their position on their own. Just guide each top end up into the open center of the brim, so it rests against the inside edge of the opening. It still looks great, and you skip the fiddly part of gluing each string into the tiny brim holes.
Option B – Optional: Glue each top end into its small hole under the brim (insert 1.1 mm). It looks the same but is more complex, since you have to line up and glue six strings overhead. Totally optional.
Total gold filament: about 51 cm for strings, plus about 15 cm for the control shafts.
All Done
Enjoy!